TC45
Summer 2019
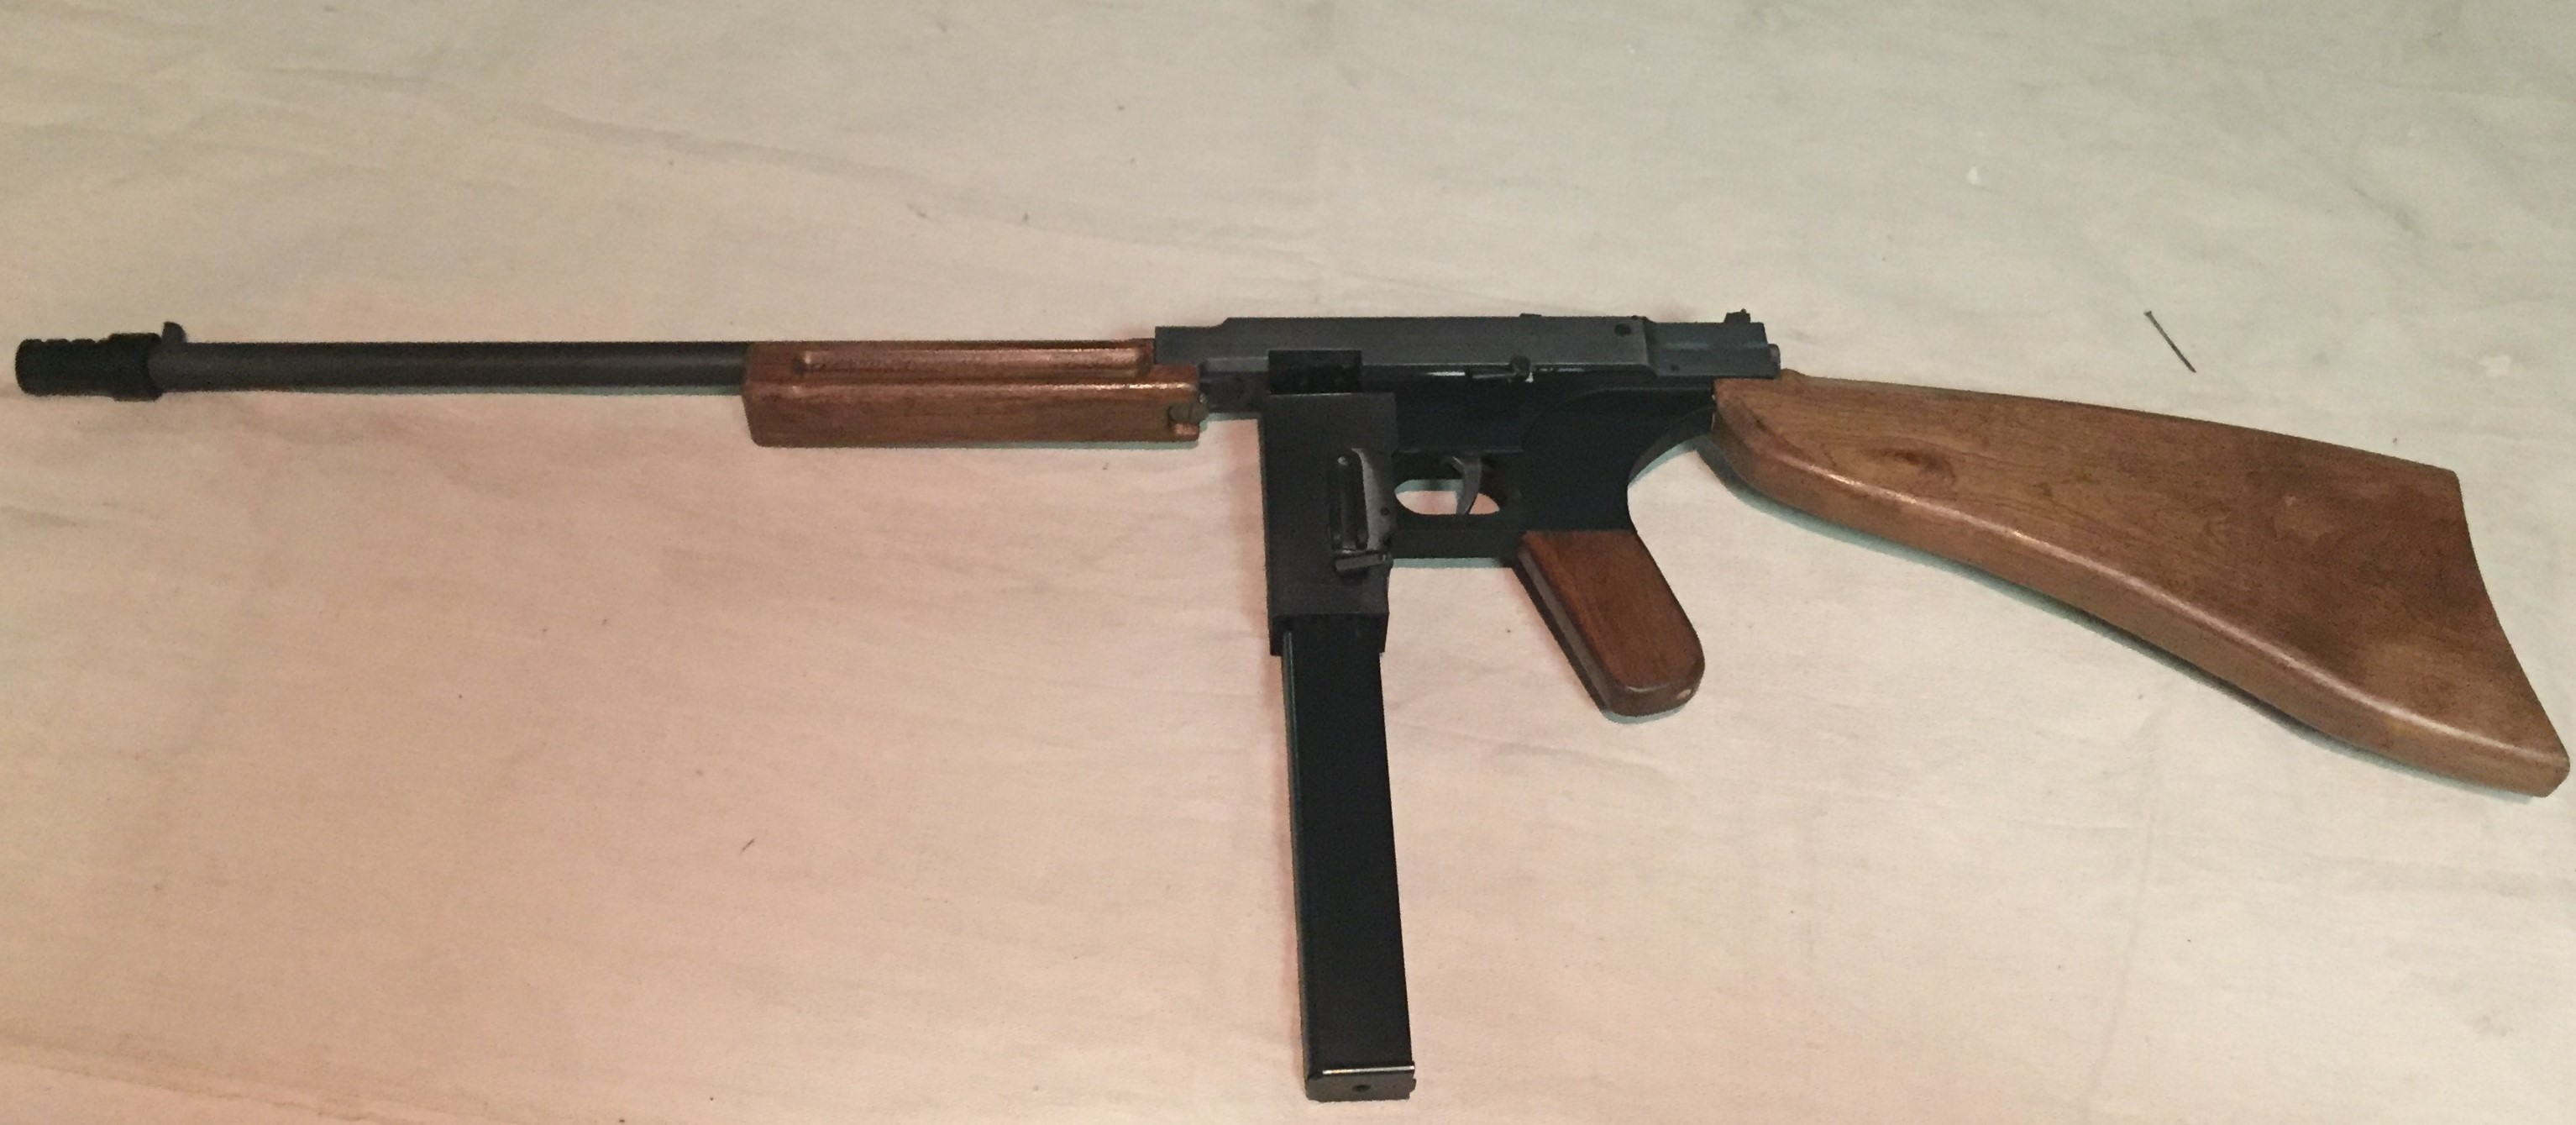
The TC45 is a toggle-delayed blowback carbine chambered in .45ACP. It is styled off the Thompson SMG.
Additional Finished Pictures (Imgur)
Additional Progress Pictures (Imgur)
Video of Firing and Slow-Motion (Youtube)
I set out to make this rifle after noting substantial flaws with the original Thompson SMG. The Thompson was also chambered in .45ACP, but it had an unusual operating mechanism. Bearing in mind that the Thompson was developed in the 1910s, without the benefit of modern science, the entire action was designed based on a faulty principle. Called the "Blish lock", it was believed that the coefficient of friction between two dissimilar metals would rise as the normal force between them increased, resulting in an exponential increase in friction force. We now know that this is generally not true unless the pressures are so high that localized yielding occurs, which is obviously going to cause other problems. Because of this error, the Thompson was basically a straight-blowback operated firearm, which means that it depends entirely on the mass of the bolt to keep the cartridge chambered long enough for the chamber pressure to fall. .45 ACP is generally considered too large a cartridge for blowback operation, because it requires an impractically heavy bolt. Not to be discouraged, however, Thompson did it anyways. The result was the Thompson SMG, one of the heaviest submachineguns ever. Despite being chambered for a much pistol cartridge, it was about the same weight as the M1 Garand battle rifle, which was chambered in .30-06 (around 9lbs). It is an obnoxiously heavy gun, and the weight is almost entirely due to the faulty design, based on an erroneous physical phenomenon.
So I set out to design a rifle that was very similar to the Thompson in appearance and chambering, but that solved its fatal flaw. Since I also enjoy unusual operating mechanisms, I decided to go with a toggle-delayed blowback design. The toggle-delayed blowback principal is a particular impementation of the general idea of "delayed blowback". The goal is to have a bolt that resists opening better than a simple blowback design would. This is done by coupling the motion of the breech face to one or more other masses, in such a way that forces acting on the breech face must accelerate the other masses faster than the breech face itself (a mechanical disadvantage). This results in a breech face that is more resistant to opening, effectively acting like additional mass, without actually adding that additional mass. Altogether this allows for the mechanism to be lighter and often slimmer. The toggle-delayed system accomplishes this with a hinged toggle attached to the bolt, starting very nearly straight. As a result, it takes a tremendous amount of force to initially bend the toggle and move the bolt back. The beauty of the toggle-delayed design, however, is that after the toggle has bent, the mechanical disadvantage is reduced, and it becomes comparatively easy to open the bolt the rest of the way. This is great, because it means the system provides very high locking force only during the time when that force is actually neccessary, and then reduces that force to allow the rest of the cycle to be completed with less stress. Optimally, the closing force would be provided by an applied torque at the rear-most toggle pivot.
The toggle bent, and the bolt fully retracted
The parts were designed in Autodesk Inventor and then I set out machining the various parts. Most of the gun was made from steel, while the lower receiver is made from aluminum and the magwell is 3D printed. Most of the machining for this build was fairly straightforward, and didn't take nearly as long as it had on previous builds. I built the trigger group as a single module that could be seperately inserted into the lower receiver, as this would make it easy to modify later if neccessary, and also conveniently retained all the pins. The hammer mainspring was designed to be adjustable as well. This trigger group ended up being the source of two design flaws. First, the disconnector was located too far back relative to the rear of the bolt when the gun is in battery. This did not impede the operation of the disconnector and so was not immediately apparent, but it was a safety risk because this allows the gun to be fired even if it is slightly out of battery. (Which, of course, I discovered following an out-of-battery case rupture). This problem was solved by adding a protrution to the back of the bolt that reached much closer to the disconnector. The second error was the location of the hammer pivot. The hammer pivot was positioned very low, such that the hammer only rotated a small angle during cocking and firing. This initially seemed like a good idea, but ended up causing problems. Because the hammer rubs against the bottom of the bolt after being cocked, the small angle meant that the hammer had a tendency to cam against the bolt and stop the bolt. This problem was solved by lengthening the hammer slightly, so that it rotated more than it otherwise would, and also by not using a hammer spring any stronger than absolutely needed.

The trigger group, fully disassembled
The next thing to make was the toggle assembly itself. This was a pretty simple process. The most critical aspect was ensuring that the holes at each end of each linkage were parallel and perpendicular to the bore axis, as any error there would rapidly stack up through all the joints in the toggle. It is also worth noting that almost all the bolt thrust during firing is directed through the toggle assembly, so it must be strong and capable of withstanding the impact loads. The bolt closure force was provided by two concentric recoil springs housed behind the toggle. A spring arm wraps around the rear toggle like a bell crank and pulls the rear link of the toggle to the closed position. These springs have a very short stroke, and so were very heavy (~60lbs together) to exert the needed force. After the mechanical advantage of the toggle, this provides a huge force keeping the bolt closed, helping to absorb the bolt thrust during firing. The critical parameter that still needed tuned, however, was the position of the toggle when the bolt is closed. In particular, just how close to straight is the toggle when the gun fires? Too straight, the the delaying effect is too severe, and the gun won't cycle reliably. Too bent, and there won't be enough delaying effect, resulting in high extraction velocity, excessive stress on the gun, and in the worst case: bulging or ruptured cases. This tuning will be discussed later.
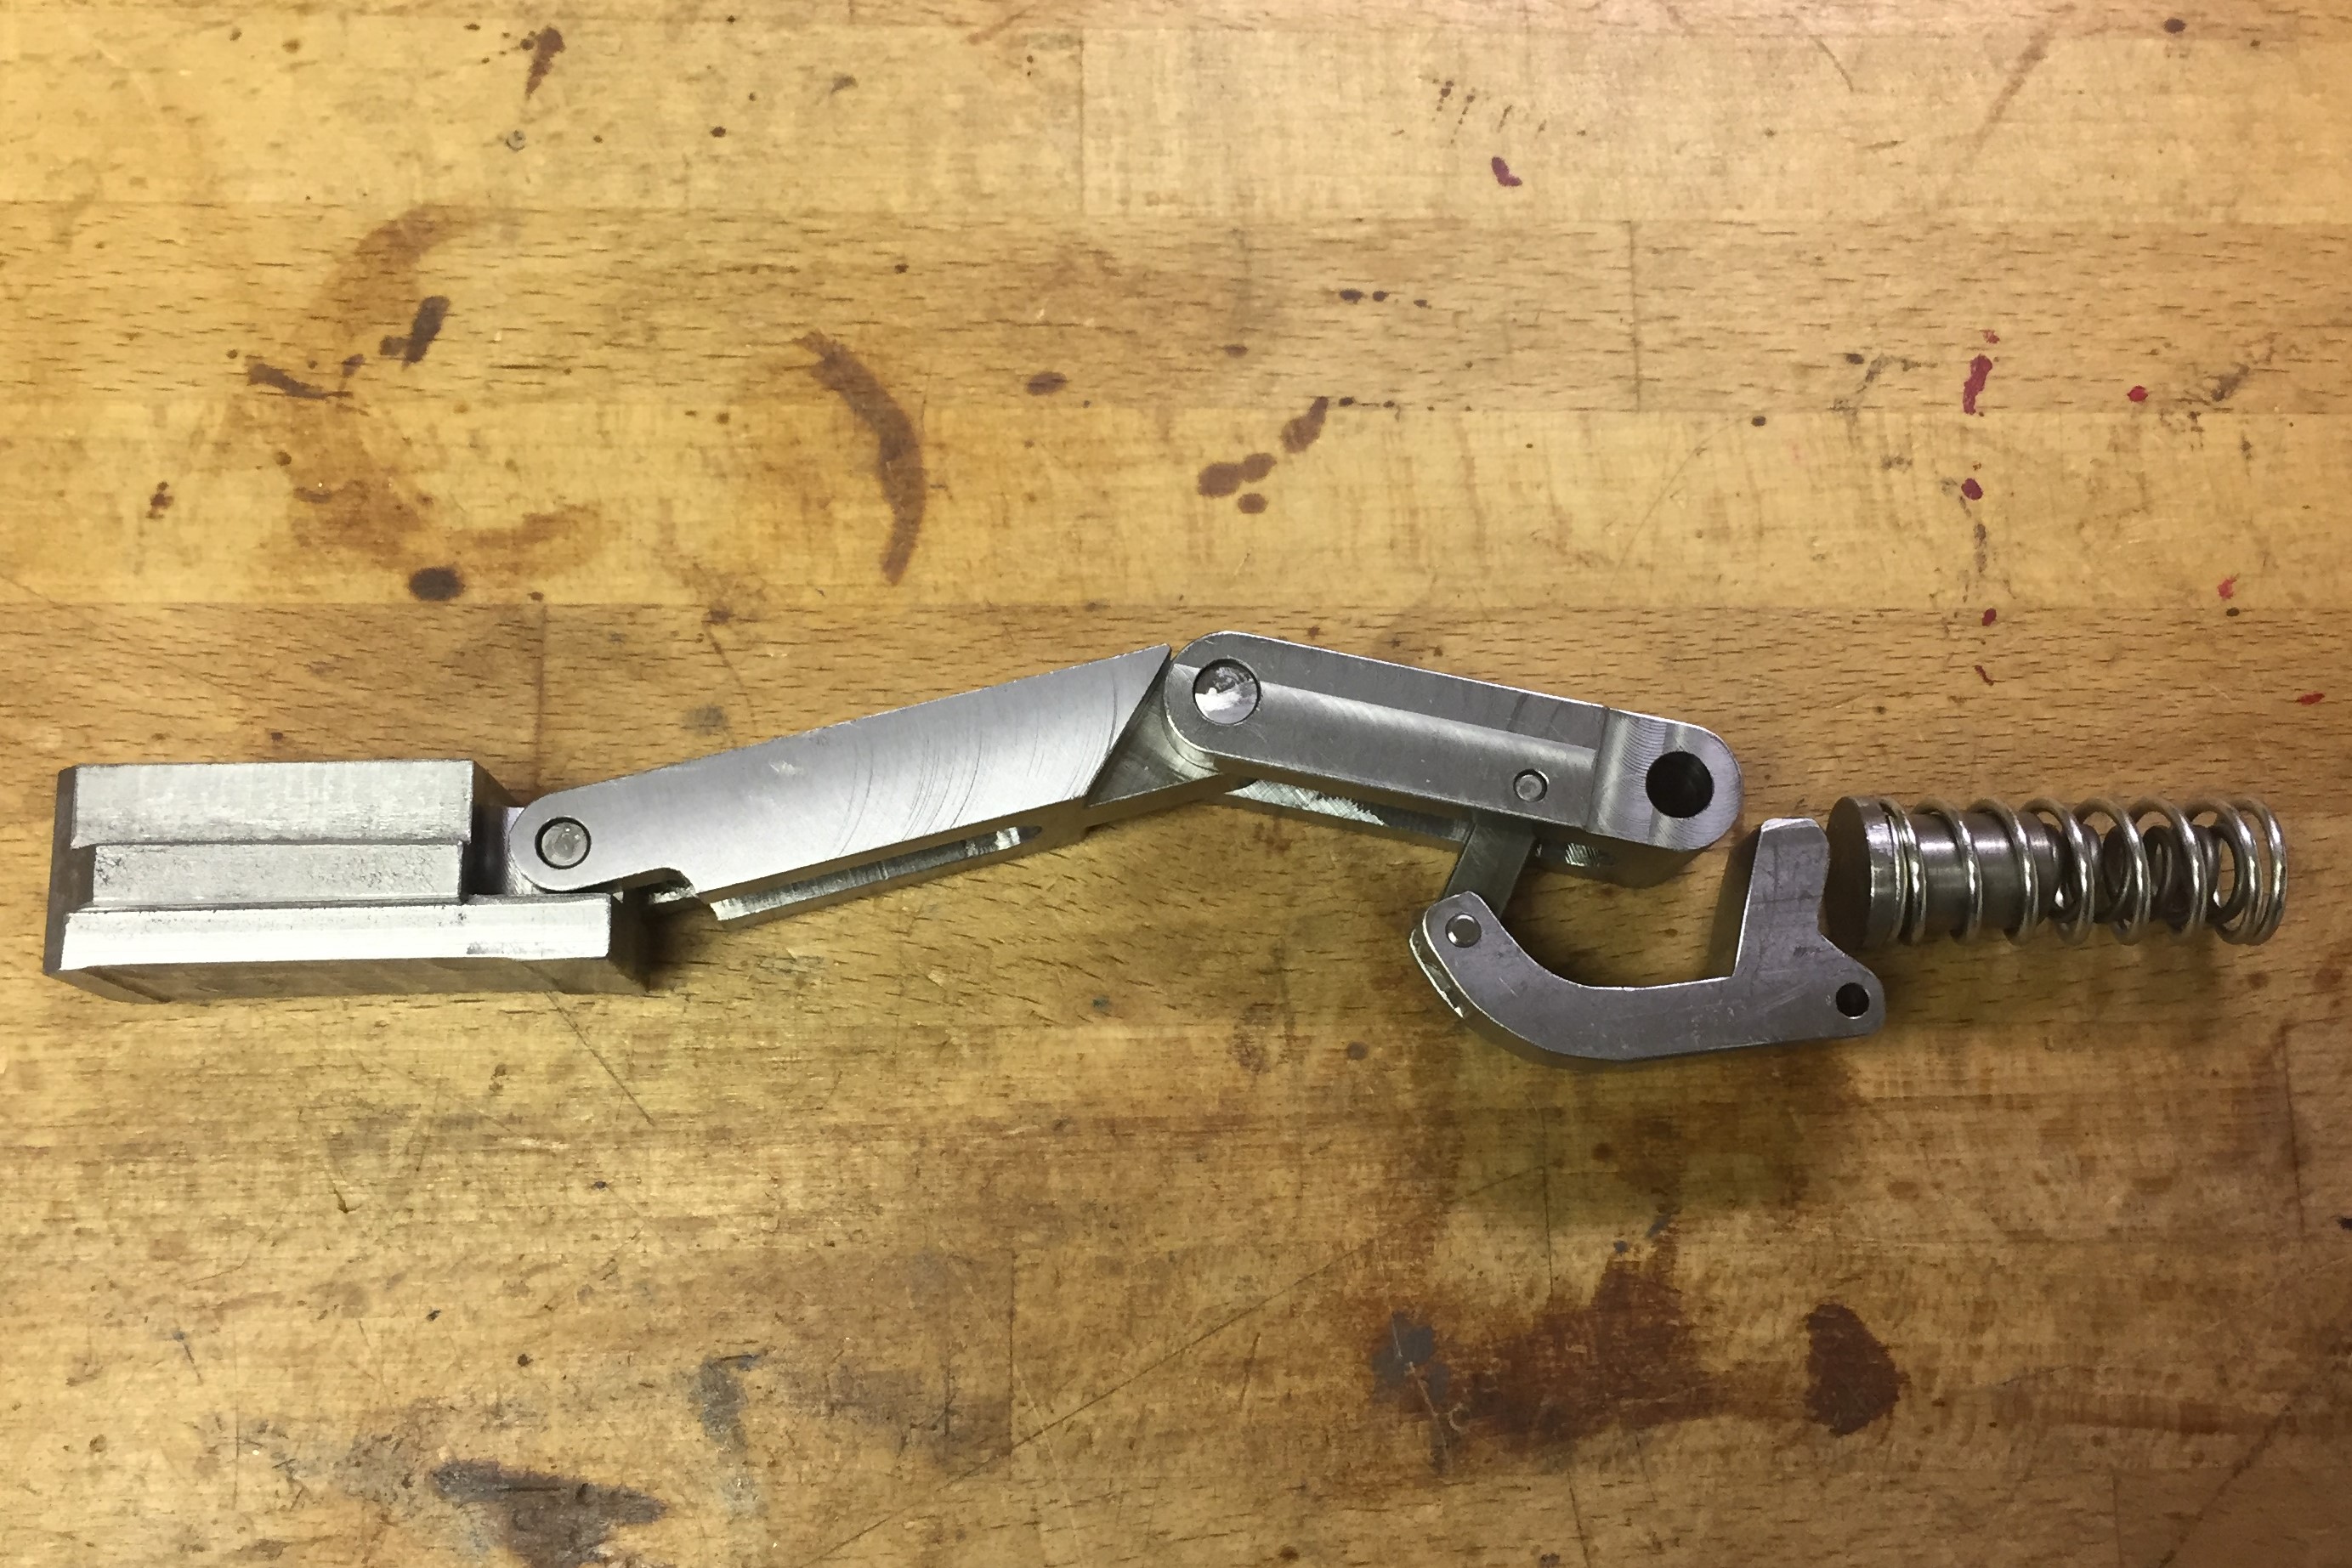
The toggle assemply, showing how the spring, bell crank, toggle, and bolt work together.
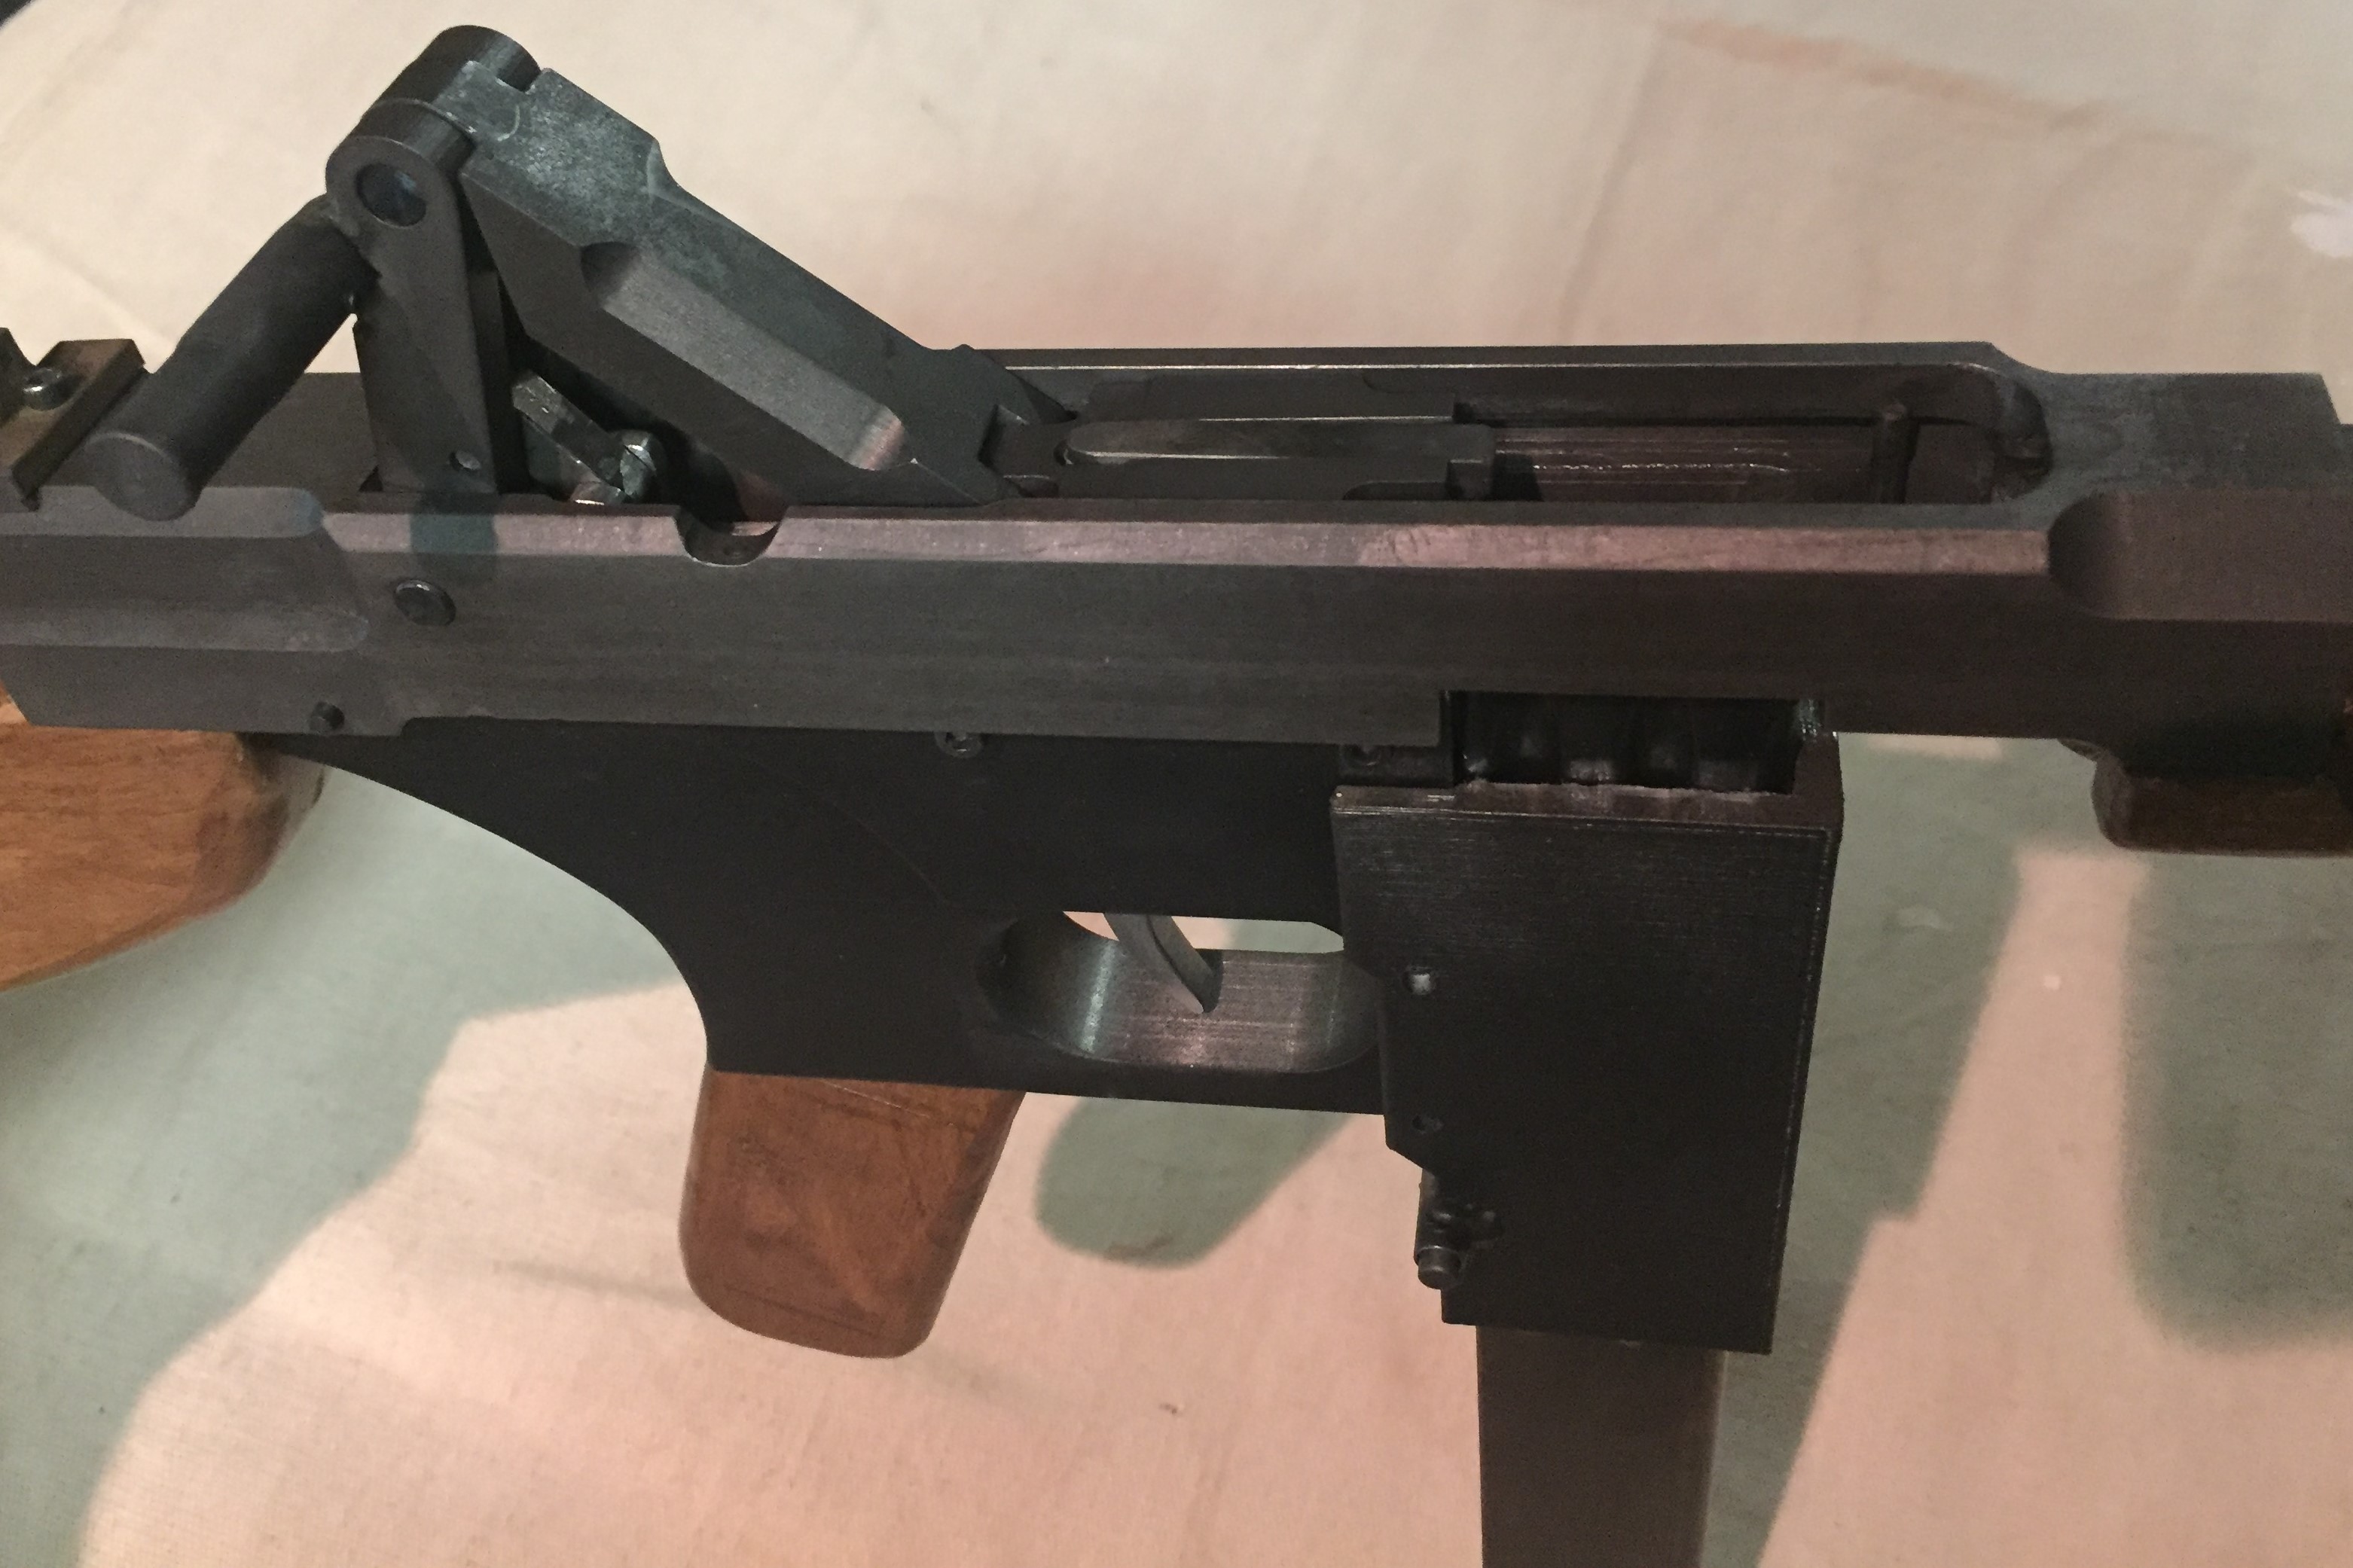
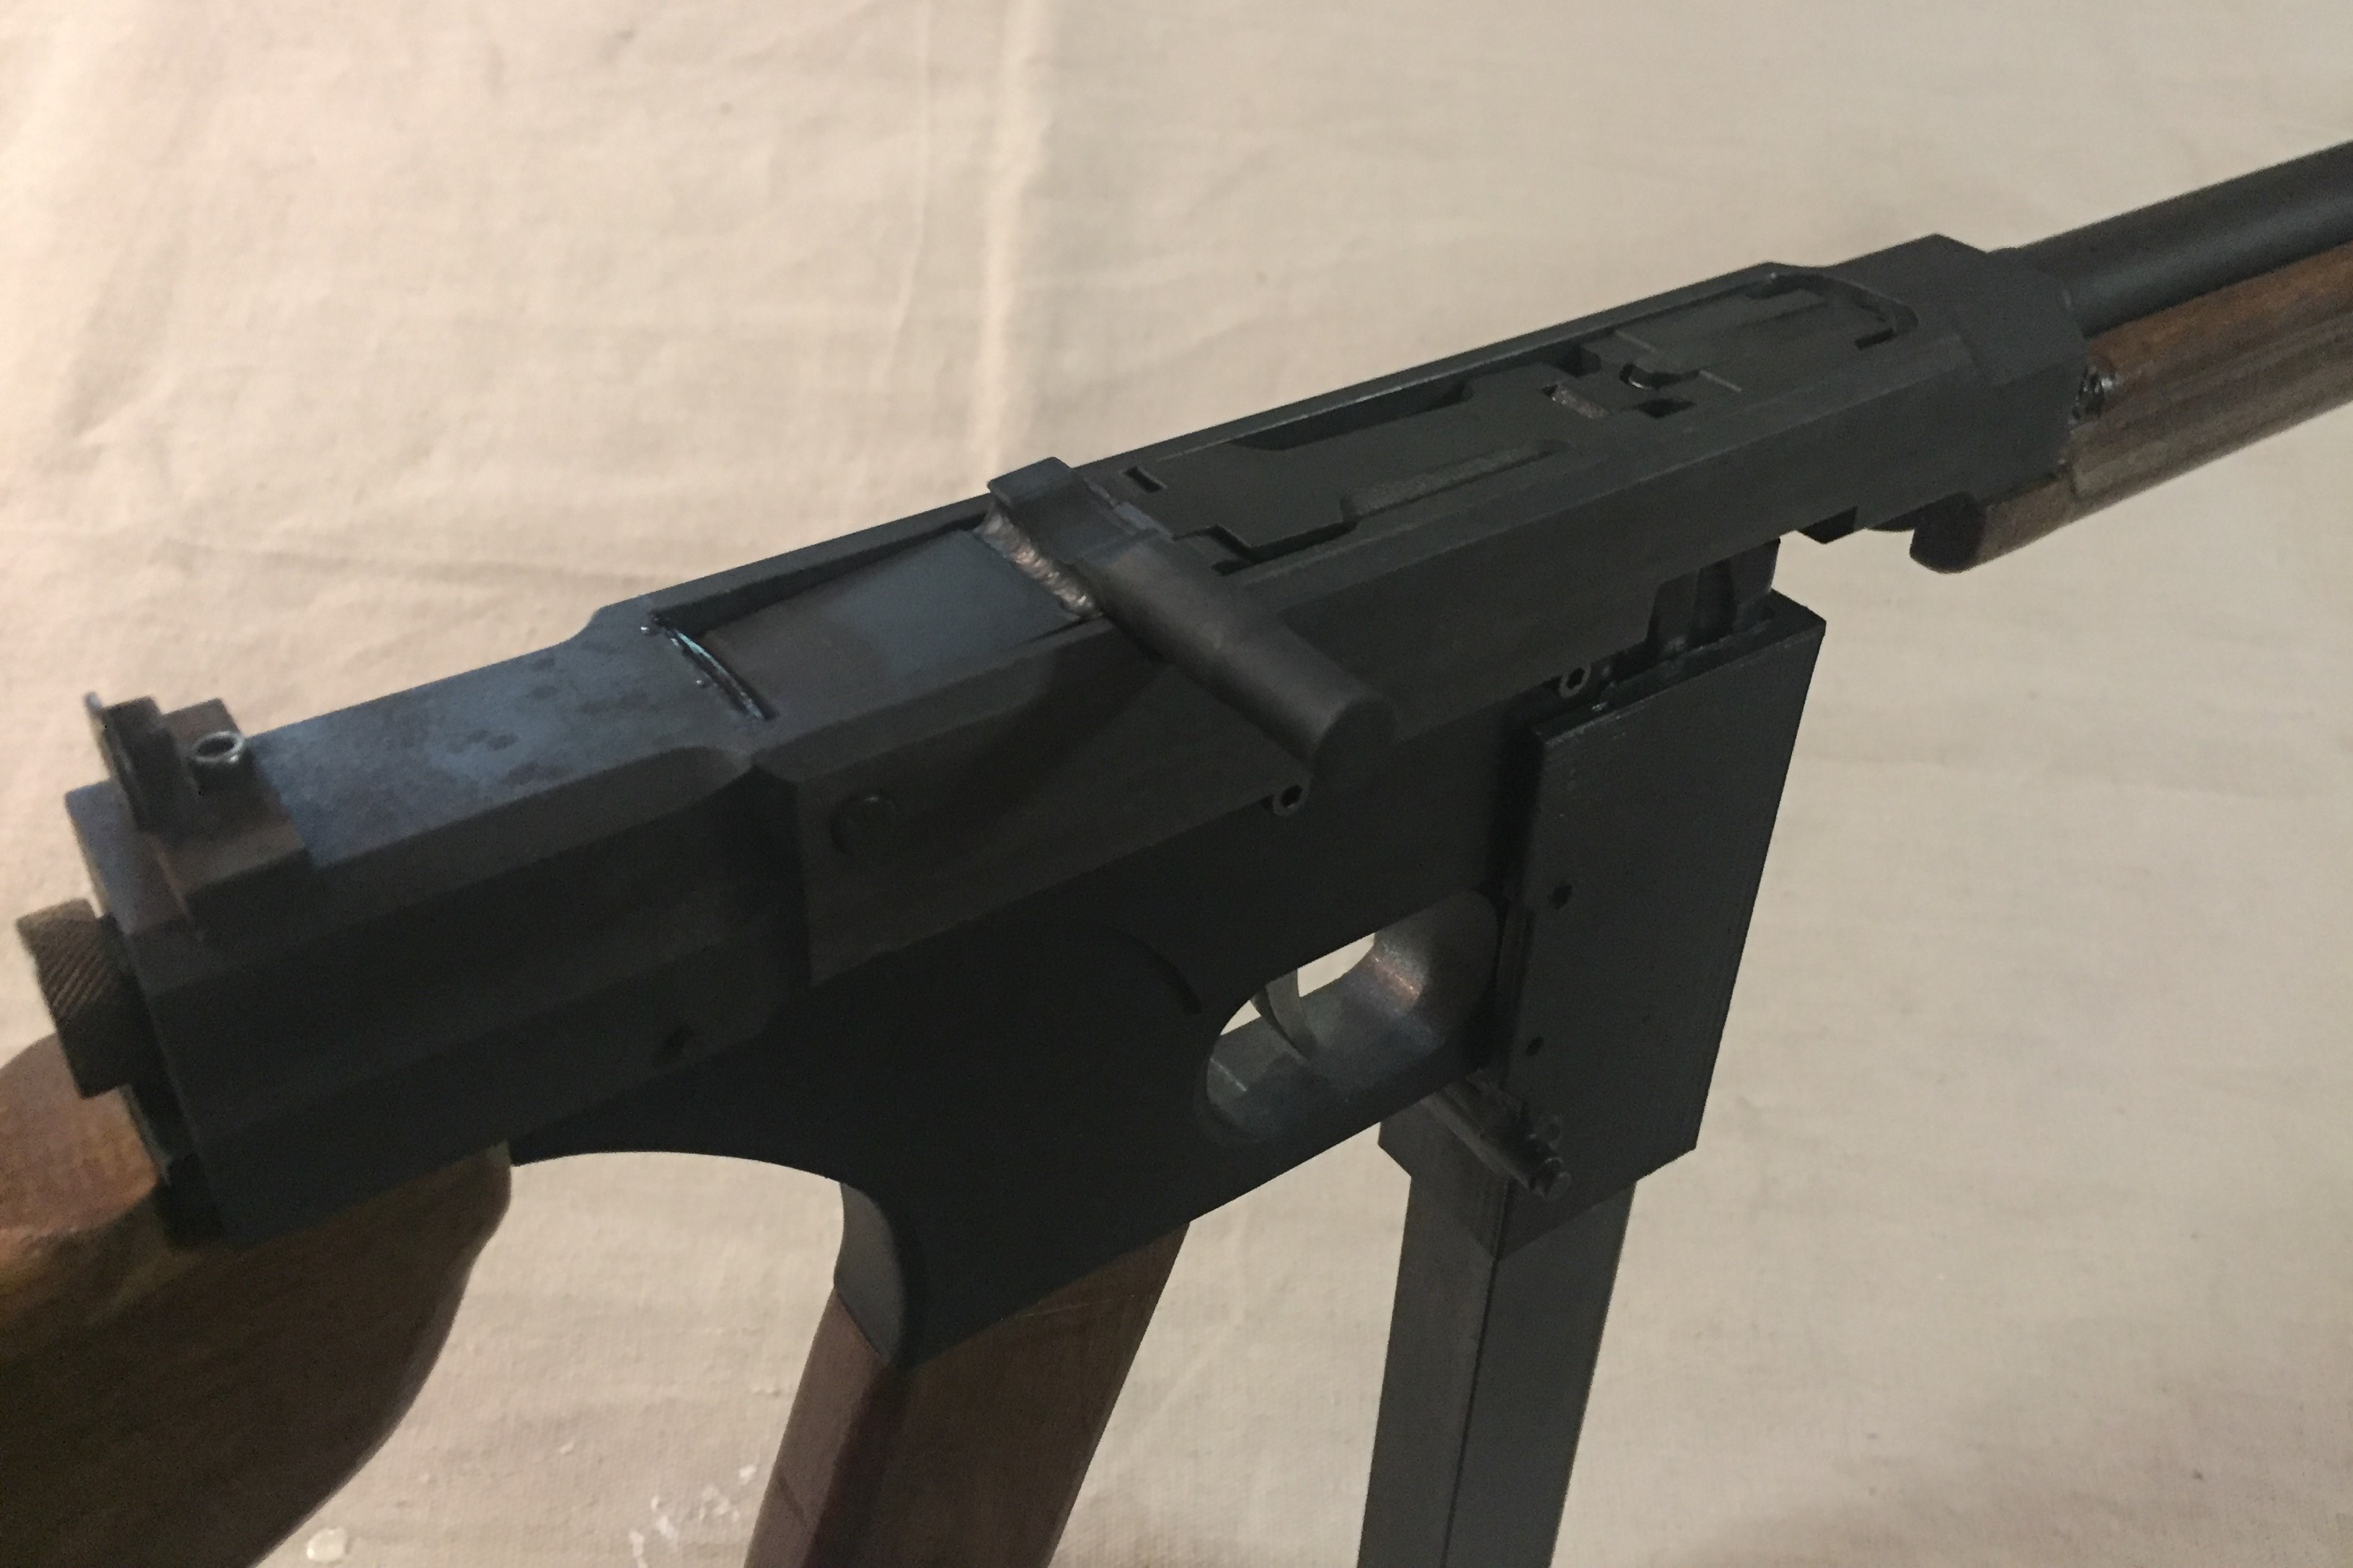
The pieces are all housed in and guided by the upper and lower receivers. These parts are larger and relatively complicated with regards to their machined features, but are only this way to guide and position all the parts. Since the upper receiver is loaded between the barrel and the rear toggle pin in tension during firing, it had to be made from steel. The lower receiver sees very low loads, and could safely be made from aluminum. The interaction between the two was accomplished very smoothly by a set of interrupted rails, allowing the upper and lower receivers to simply slide together very quickly and easily, and then a simple takedown lever locks them in place. This takedown concept was a huge part of this design, unlike many of my previous designs; this gun was deliberately designed to be rapidly and easily field stripped and put back together. The forend and buttstock are each held on by a single thumbscrew, while the main forces are transmitted through rails and recesses, so the screws only retain the parts. Once the rear toggle pin and the bell crank pin are removed, the entire toggle assembly can be pulled back and then twisted, and can then be removed from the receiver as one large module.
The lower receiver, with trigger group inside. Note the rails that connect it to the upper receiver.
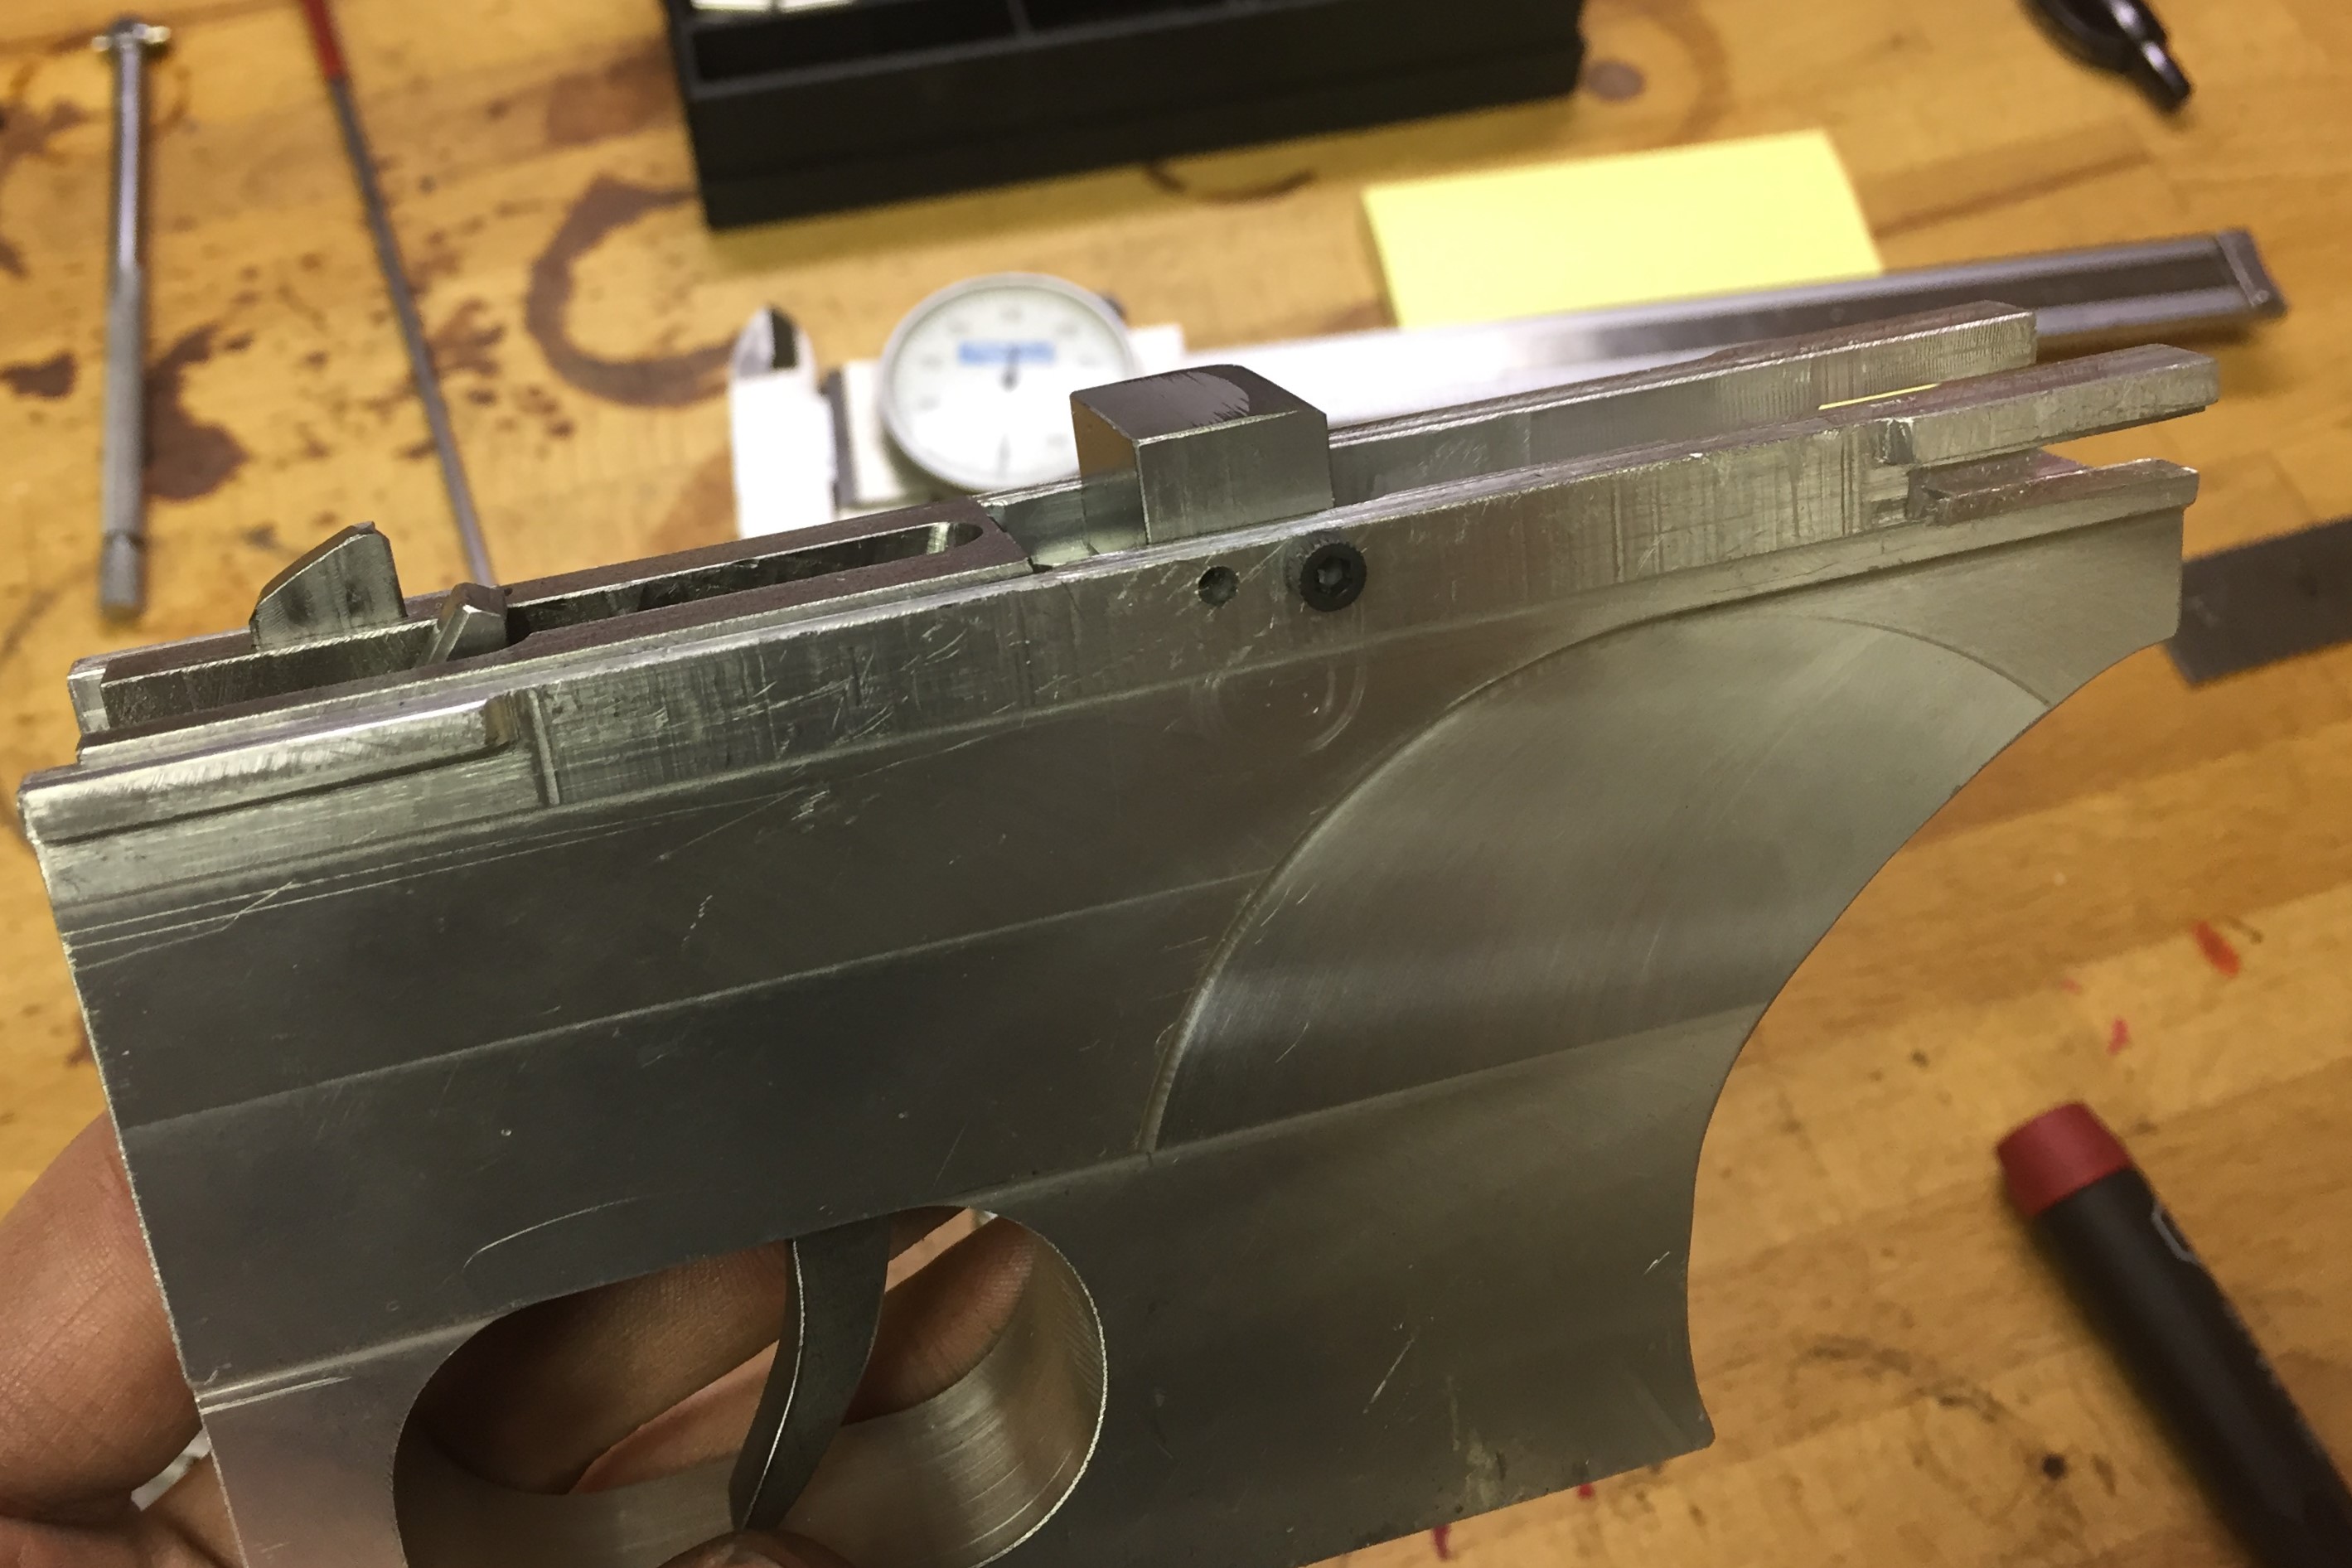
The barrel was made from high-strength steel, and was drilled, reamed, button rifled (homemade button as well, just some hardened O1 tool steel), then hammered straight and turned between centers to eliminate most eccentricity. It is 16.5" long. Then it was threaded to fit the receiver and the chamber was cut. I made a headspace go-gage so that I could carefully open up the headspace until it met SAAMI specifications. This was done by carefully reaming the chamber deeper and deeper. The stock and forend were made from cherry wood from my woods, inletted for the attachment devices, and were stained and polyurethaned. Lastly a magazine was needed. Magazines are actually one of the most difficult parts of a semi-automatic firearm to make, so they are generally the only part I allow myself to purchase instead of make. To match the style of the gun, I went with commercial .45ACP UZI magazines, in this case a 22-round magazine. These worked well because they had no rake, or angle. I 3D printed a magazine well and secured it to the lower receiver. A simple push-button magazine release was made and carefully adjusted until the magazine fit snugly with minimal motion and locked in reliably. At this point, I just needed to tweak the design and tune it. Initially, the toggle position was controlled by a block attached to the lower receiver, visible above, which would contact the rear toggle joint and stop the toggle from closing further. This ended up being overkill, and took too much work to modify. I realized that it would be much easier to just mill the point where the bolt handle contacts the upper receiver, and that would serve the same function. I tried a few different positions and settled on an optimum one, and used a setscrew as a stop to maintain that position. The next problems to tackle were feeding and ejection. Feeding was tricky, and ultimately required reshaping the bolt head and adding two vertical rods on either side of the chamber to help push the rear of the cartridge toward the center axis, as it was often camming sideways due to the relatively large width of the bolt. In retrospect, the entire toggle assembly could have been made narrower, and likely would have prevented this problem. Ejection was easier, and was easy to diagnose using the slow-motion feature on my cellphone. Through that insight I made the ejector longer, so that it would strike the cartridge earlier, before it had a chance to slip off the ejector, and I lowered the front of the ejector, to help the cartridge "roll" up and launch itself out of the action. In most firearms, the case is not directly launched out of the gun, but is generally just set spinning rapidly, whereupon the front of the case strikes some surface, which then pushes the case out of the gun. Because of this, changing the way the case spins is the best way to alter the overall ejection pattern. I also needed to make the bottom of the bolt a little lower to realiably catch the round from the magazine, so I had to silver-solder a bead on the bottom and them file it back down. Eventually this sort of tuning brought the gun to fairly reliable operation.

An example feeding jam. This jam was solved by adding the two vertical pins that would push the rear of the case toward the center, aligning it axially.
The final touches to the gun included adding a muzzle break and aperture sights, and then finishing the surfaces. The steel surfaces were all parkerized with my DIY parkerizing setup (also on this site). The aluminum and 3D printed lower assembly was harder. Aluminum (and obviously plastic) cannot be parkerized, so I needed to do something else that would still look good next to the parkerizing. I tried several things but ultimately decided that a simple coat of black satin paint looked good. Glossy paints would have been far too jarring next to the nearly flat parkerizing.
I am extremely happy with this gun. It took by far the least amount of time of any gun I've made, despite being a fairly complicated one, and also by far the most reliable and well-executed, and feels the closest to a "real" manufactured gun. It does make me feel good, since it suggests I'm getting better and more efficient at designing and making guns!
The finished gun.
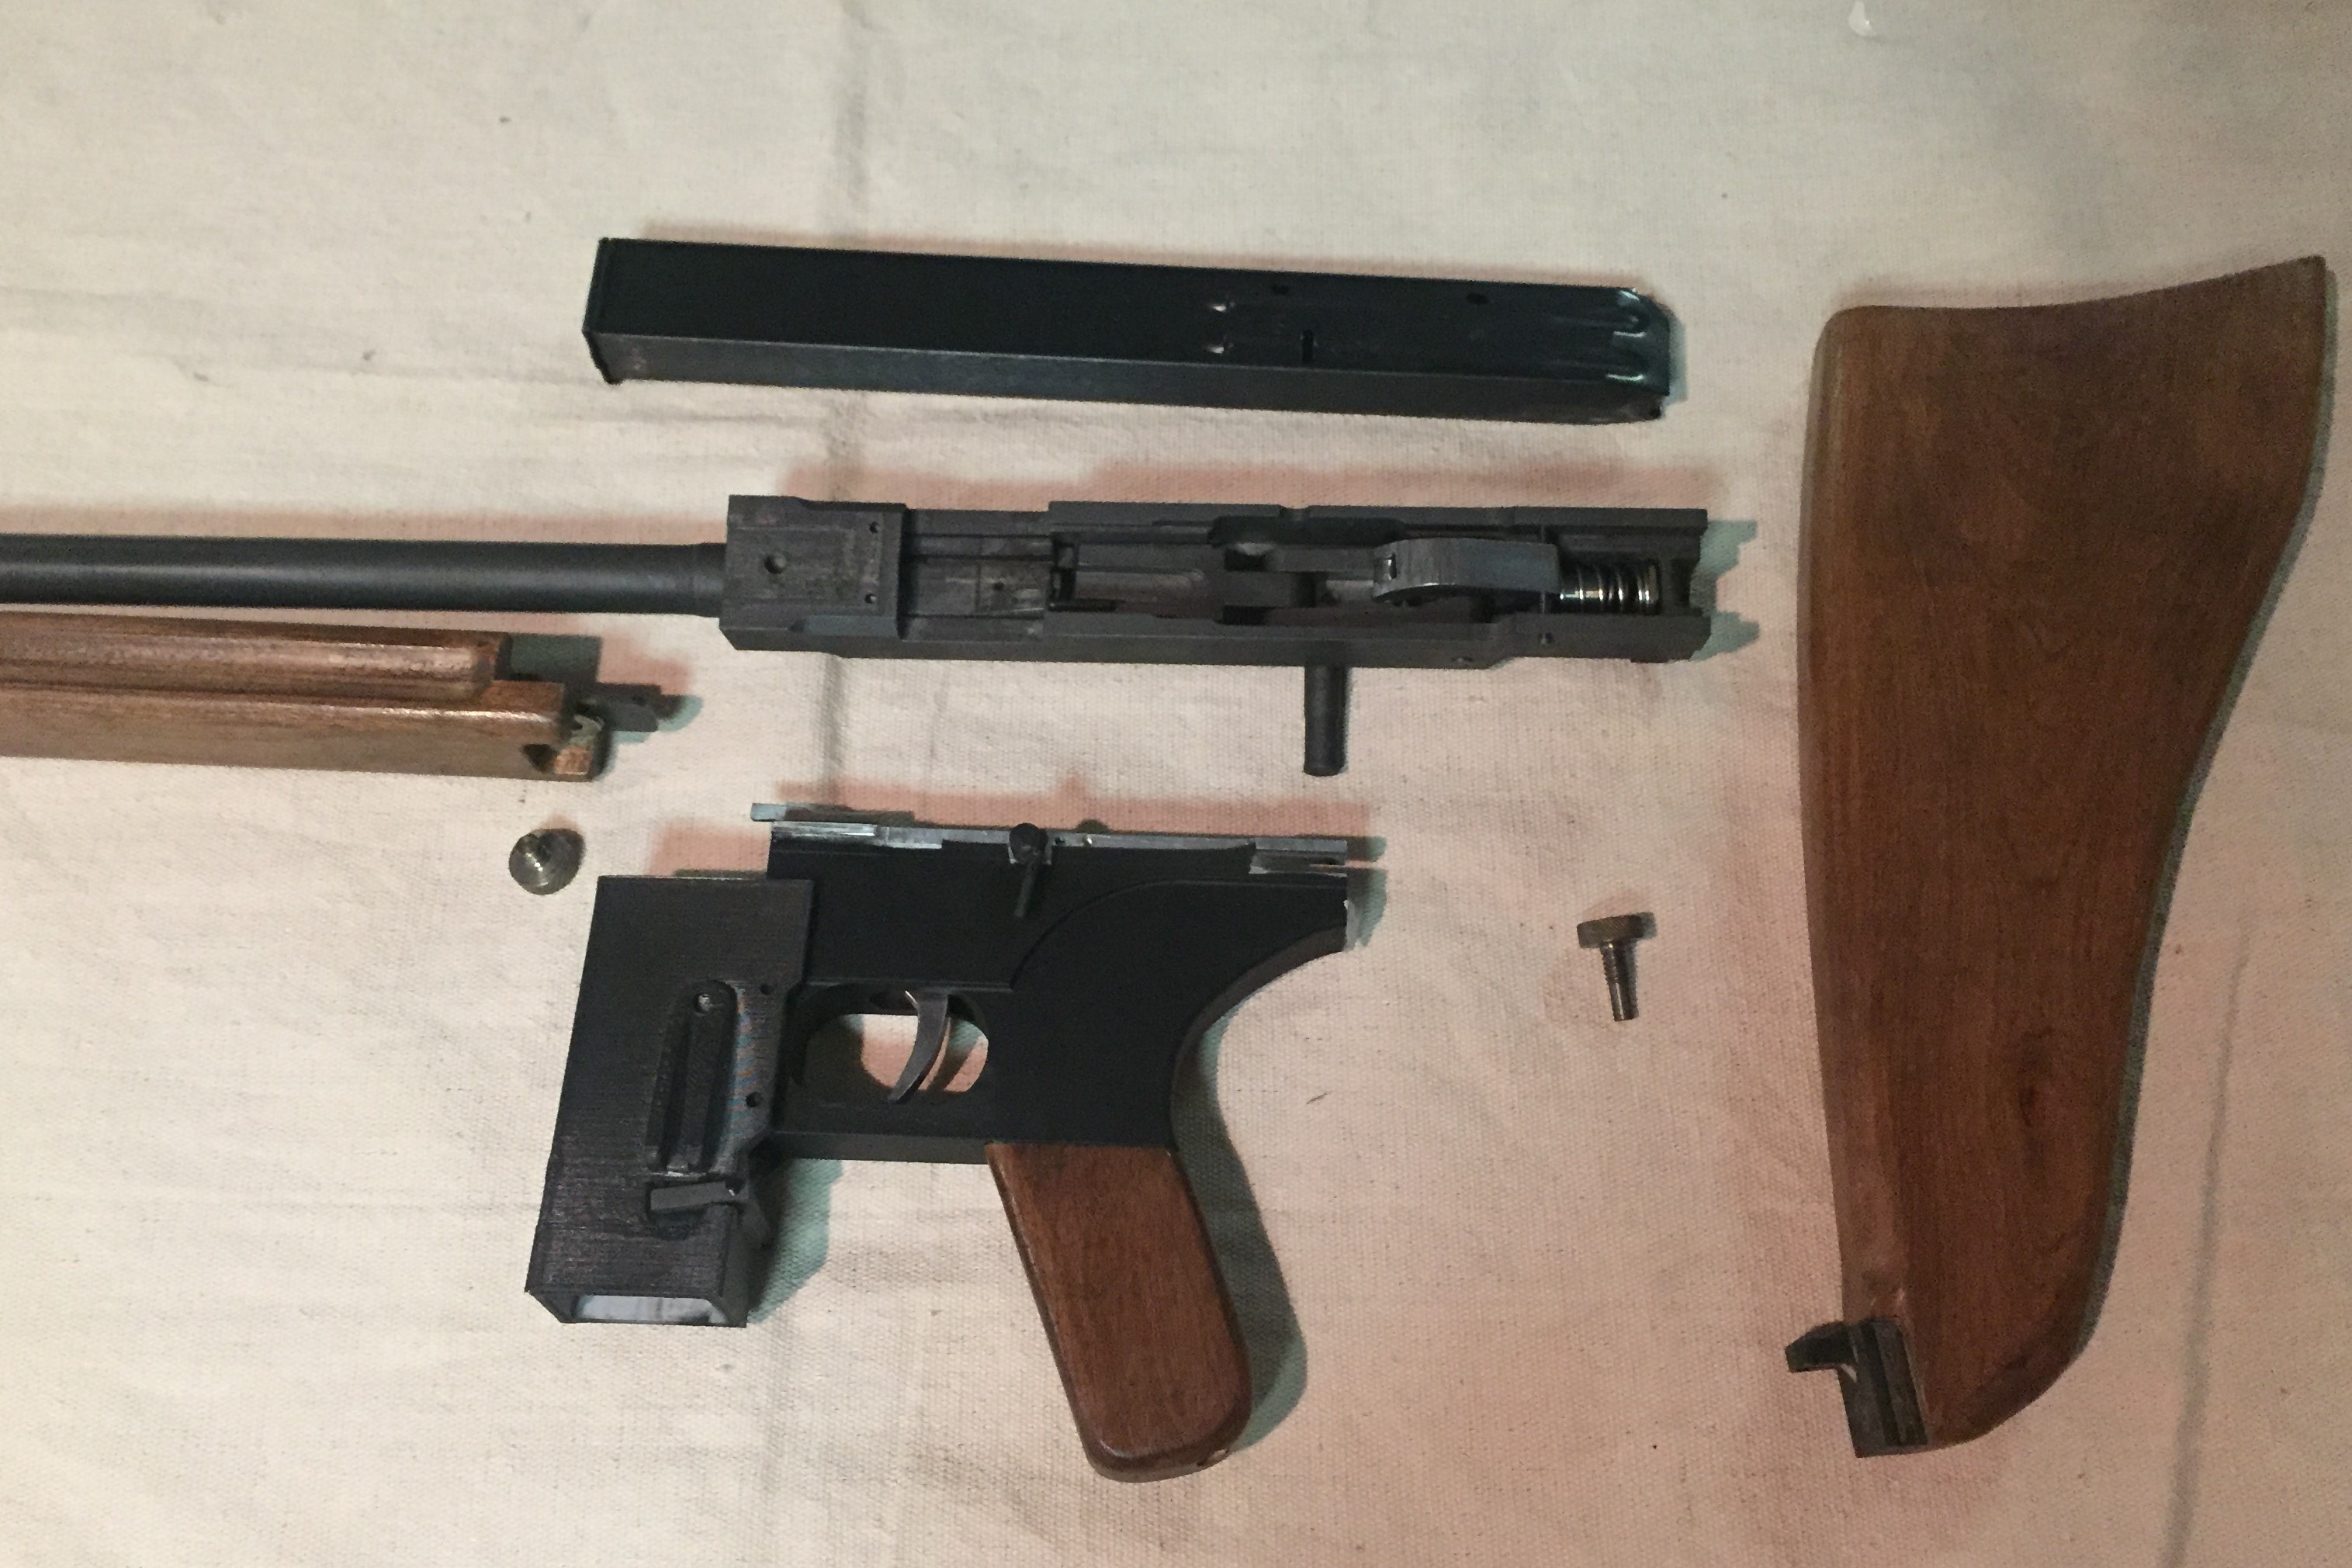
The gun field stripped, via two thumbscrews for the furniture, then the takedown lever releases the lower receiver.